
Assemble test pipeline via Pipeline Assembler
Pipeline Assembler is Testany's visual authoring tool for test pipeline orchestration. You can add cases on a canvas, connect execution dependencies, configure whenPassed / whenFailed, mark expect: fail, or switch to YAML View to edit the underlying Pipeline YAML directly.
For all new pipelines, use kind: rule/v1.3. rule/v1.3 supports case-level parallel scheduling. rule/v1.2 remains available for backward compatibility only and does not support case-level parallel execution.
Before You Start
Make sure the following prerequisites are ready:
- Every case you want to include has already been registered in the Test Case Library.
- You understand the execution relationship between those cases: which cases can start first, and which cases must wait for an upstream case to pass or fail.
- If you need relay, the upstream case exposes Relay-Out output variables and the downstream case declares matching Relay-In input environment variables.
Open Pipeline Assembler
Create a New Pipeline
- Select the target Workspace from the top navigation.
- Open the Pipelines page from the left navigation.
- Click Assemble pipeline in the top-right corner.
- Enter Name and optional Description, then click Submit.
- Testany creates the Pipeline and opens the Pipeline detail page.
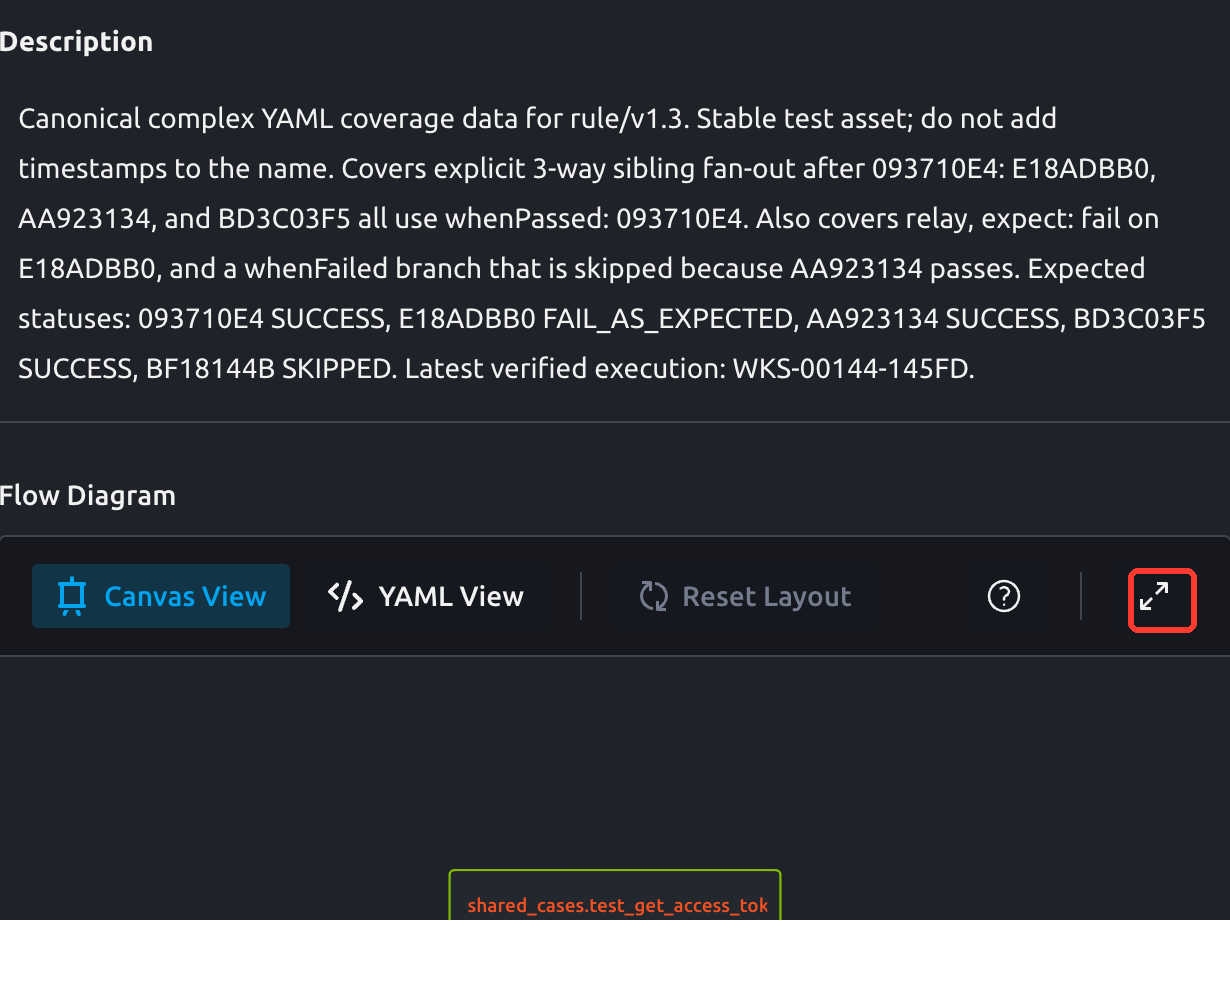
- In the Flow Diagram section, click the Open Pipeline Assembler icon to enter the editable Pipeline Assembler.
The screenshot below shows the Flow Diagram section on a Pipeline detail page. The red box marks the Open Pipeline Assembler icon. The case keys are examples only; use the cases from your own Workspace when authoring a Pipeline.
Edit an Existing Pipeline
- Open the target Pipeline from the Pipelines list.
- Review the current graph in the Flow Diagram section.
- Click the Open Pipeline Assembler icon in the top-right of the Flow Diagram.
The Pipeline detail page starts with a read-only Flow Diagram. To change cases, dependencies, relay, or YAML, enter Pipeline Assembler first.
Understand the Editor
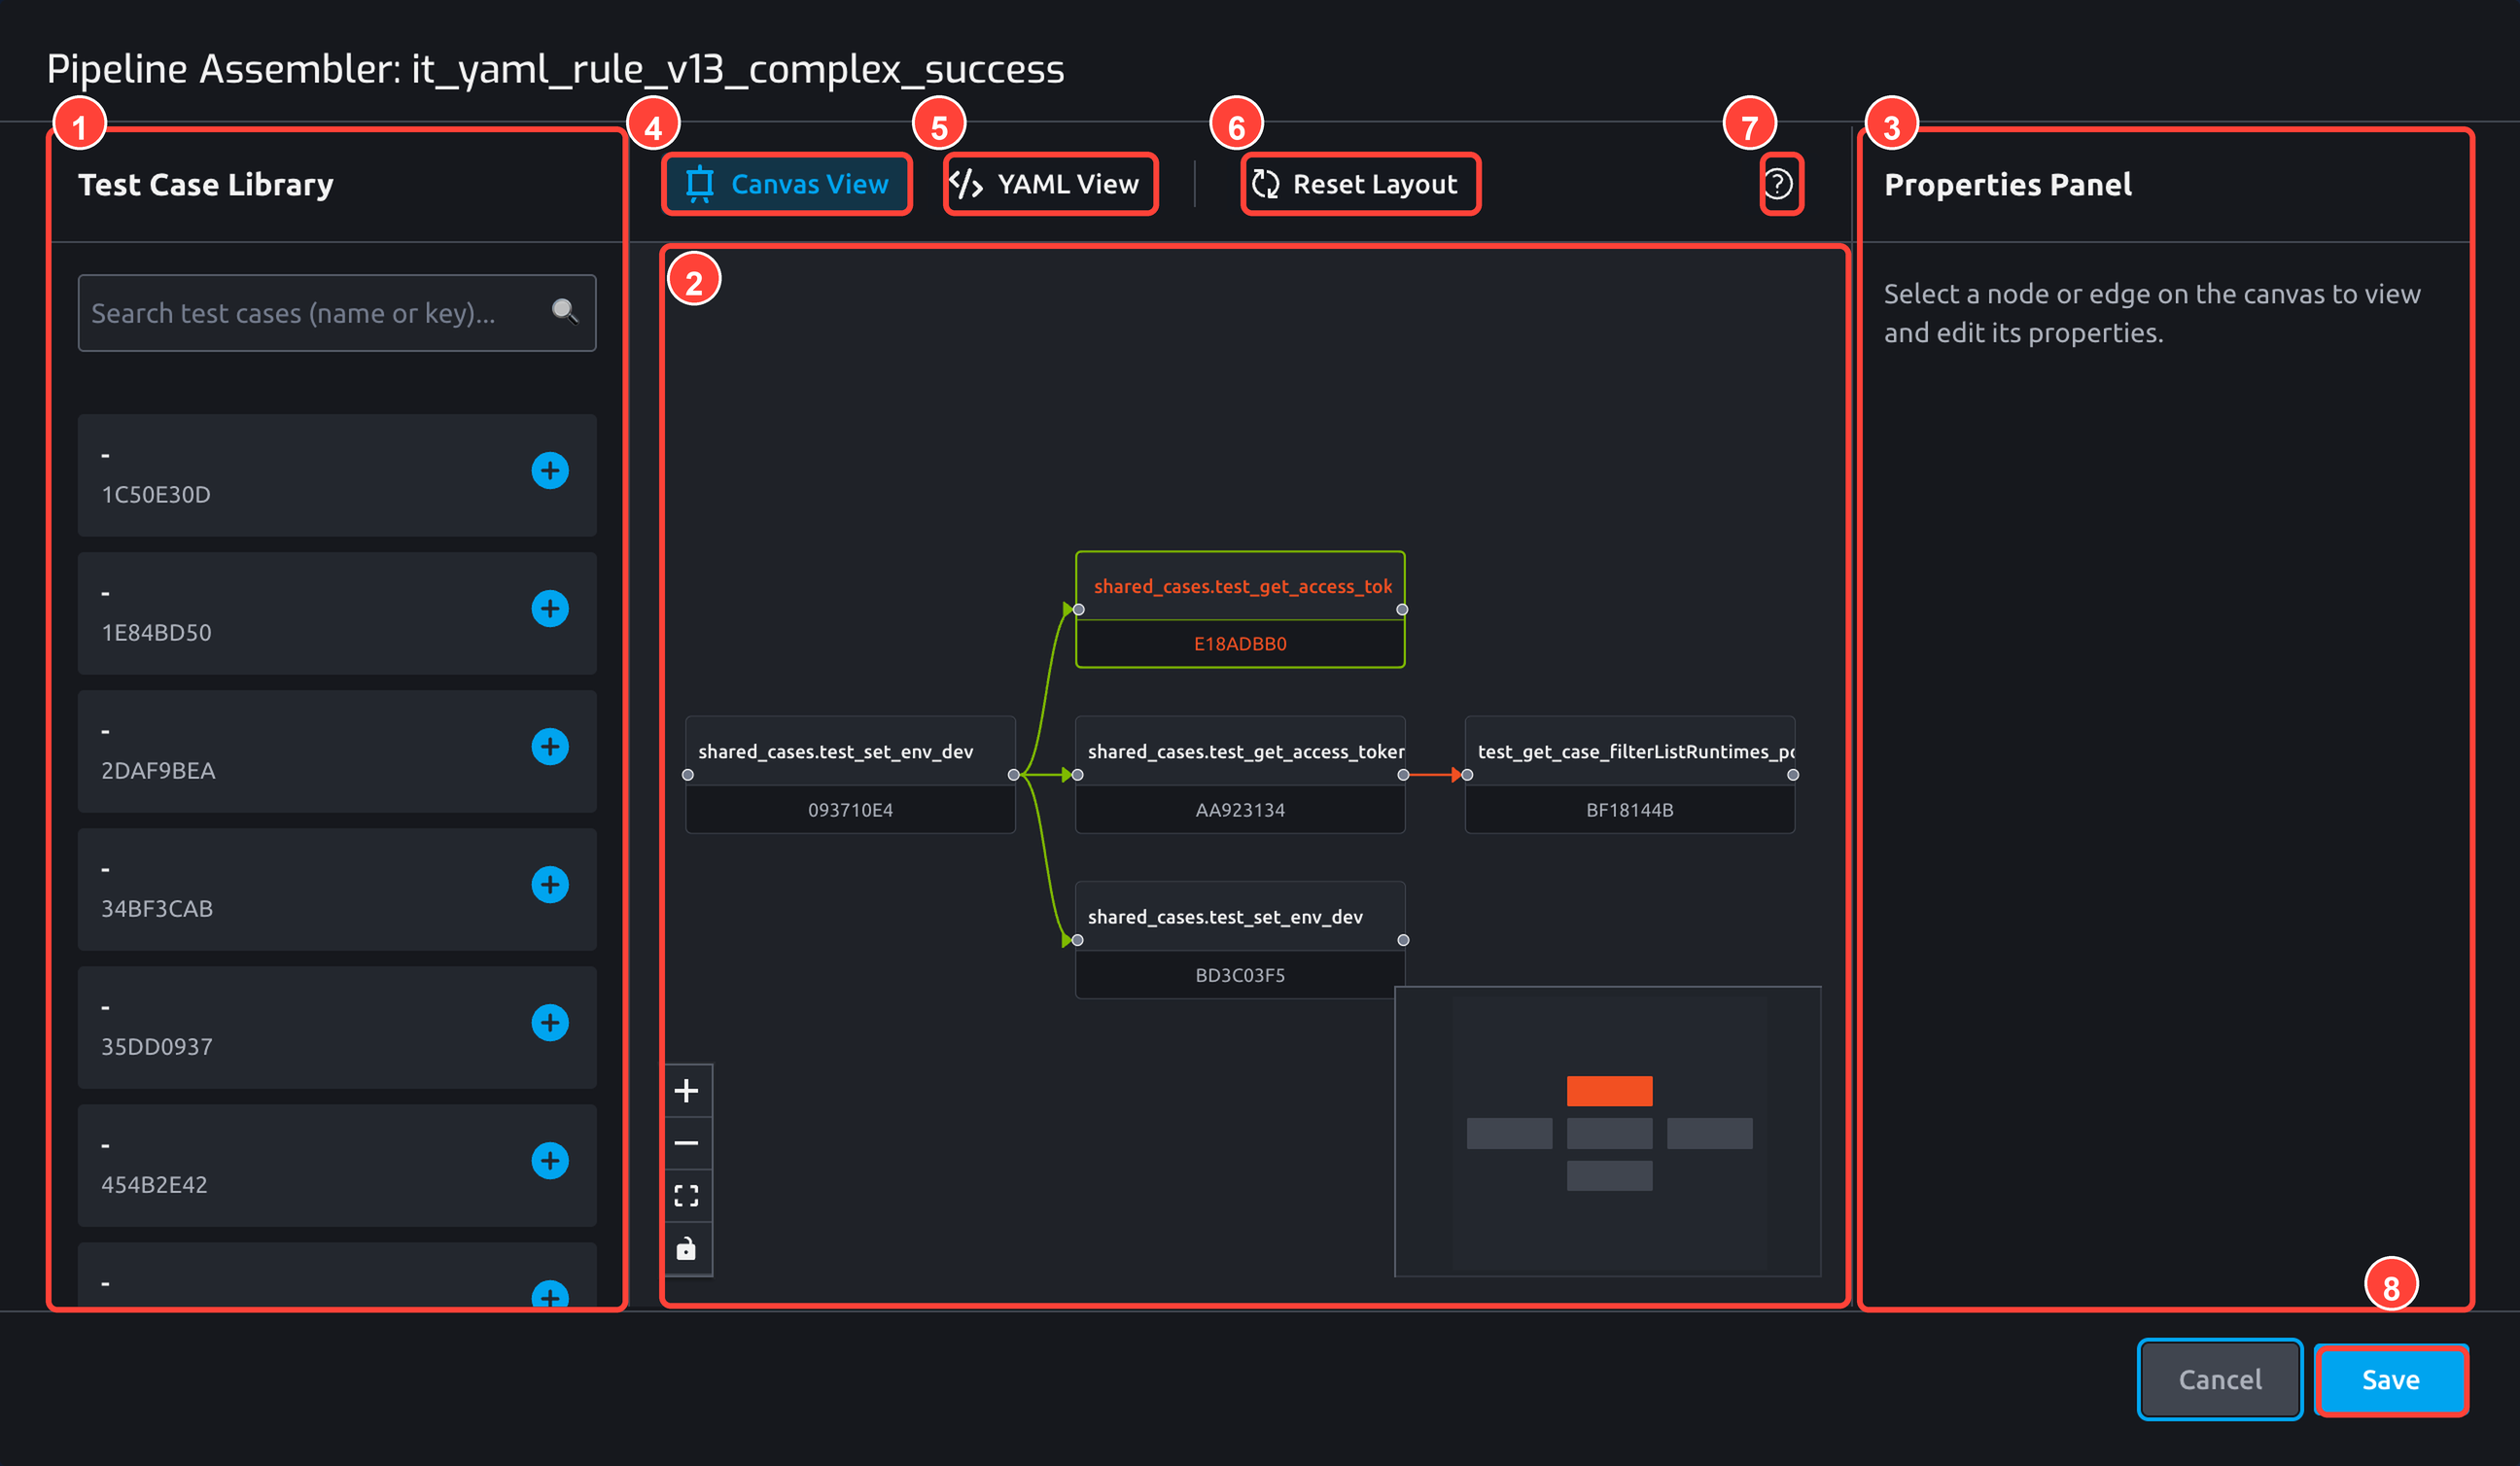
Pipeline Assembler is split into the numbered areas and controls shown below:
- Test Case Library: search cases and add them into the current Pipeline.
- Canvas View area: visually edit case nodes and execution dependencies.
- Properties Panel: review or edit the selected node, edge, Expect Fail, Relay-In, and Relay-Out settings.
- Canvas View button: return to the visual canvas.
- YAML View button: edit YAML directly.
- Reset Layout button: reorganize the canvas layout.
- Legend button: review node and edge meanings.
- Save button: validate and persist the current Pipeline definition.
Author in Canvas View
Add Cases
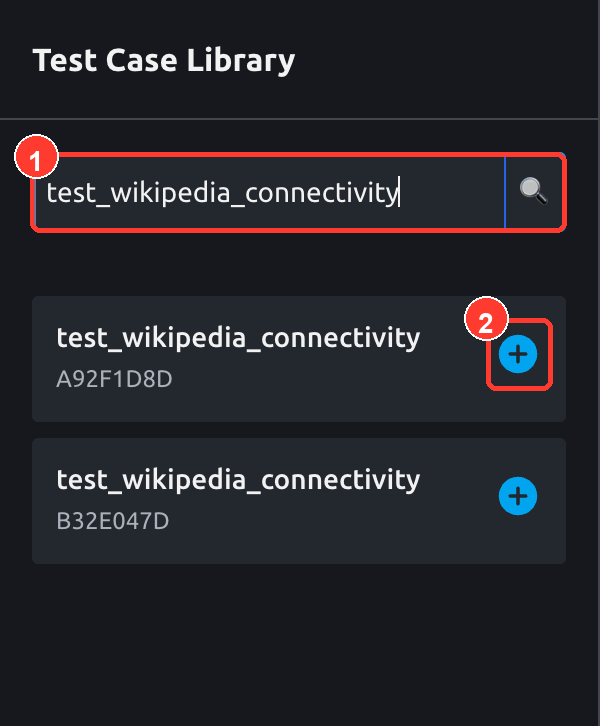
In the left Test Case Library, search by case name or case key, then click Add to Pipeline. The selected case appears as a node on the canvas.
In the screenshot, 1 marks the search box and 2 marks the Add to Pipeline button:
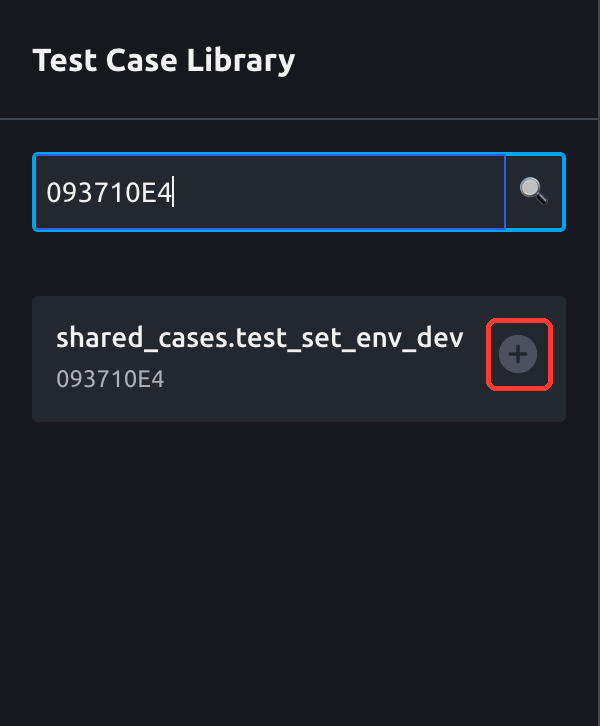
If a case is already in the current Pipeline, the add action is disabled and the case cannot be added again. Each run case key must be unique within one Pipeline.
After a case is added, or when the case is already in the Pipeline, the add button changes to a disabled state so it cannot be inserted twice. The red box marks that disabled state:
Create Execution Dependencies
On the canvas, drag a connection from the right-side handle of an upstream case node to the left-side handle of a downstream case node. A new connection defaults to whenPassed, meaning the downstream case is scheduled only after the upstream case reports Passed to the Pipeline.
After selecting an edge, the right-side Properties Panel shows:
- Edge Type
- Source
- Target
The right-side panel below shows a selected whenPassed edge from 093710E4 to E18ADBB0. The red box marks the Switch to WhenFailed button.
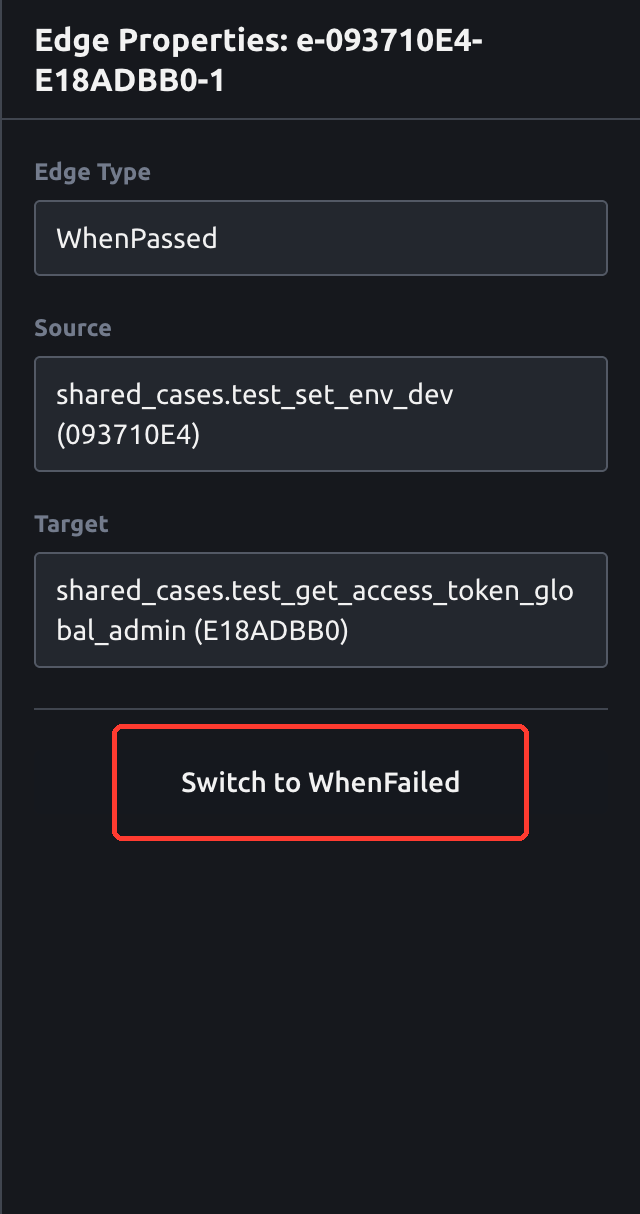
To change the condition from whenPassed to whenFailed, click the Switch to button in the Properties Panel.
After the switch, Edge Type shows WhenFailed and the panel offers the reverse action. In the screenshot, 1 marks the changed Edge Type and 2 marks the Switch to WhenPassed button.
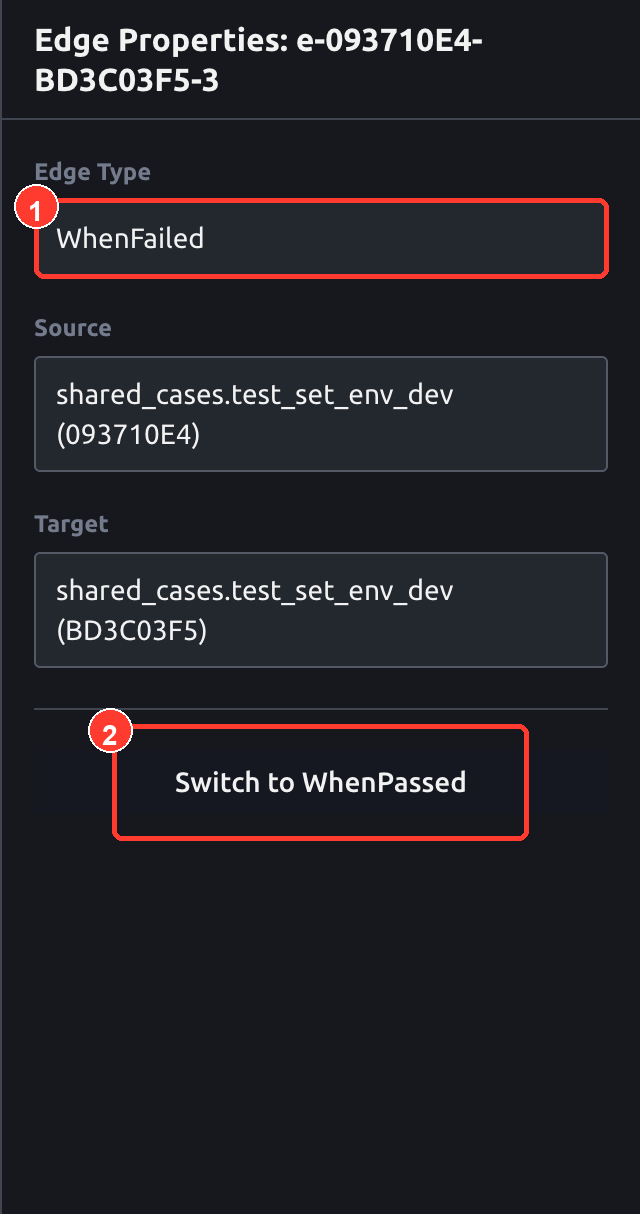
Each case node can have at most one incoming execution dependency. In other words, a downstream case can be directly triggered by only one whenPassed or whenFailed condition. The system also prevents self-loops and cyclic dependencies.
Author Fan-Out Parallel Branches
In rule/v1.3, fan-out does not have a separate YAML field. In YAML, the structure is multiple downstream cases whose whenPassed or whenFailed fields reference the same upstream case with the same trigger condition.
In Canvas View, connect one upstream node to multiple downstream nodes. The red box marks the three outgoing whenPassed connections from the same upstream case:
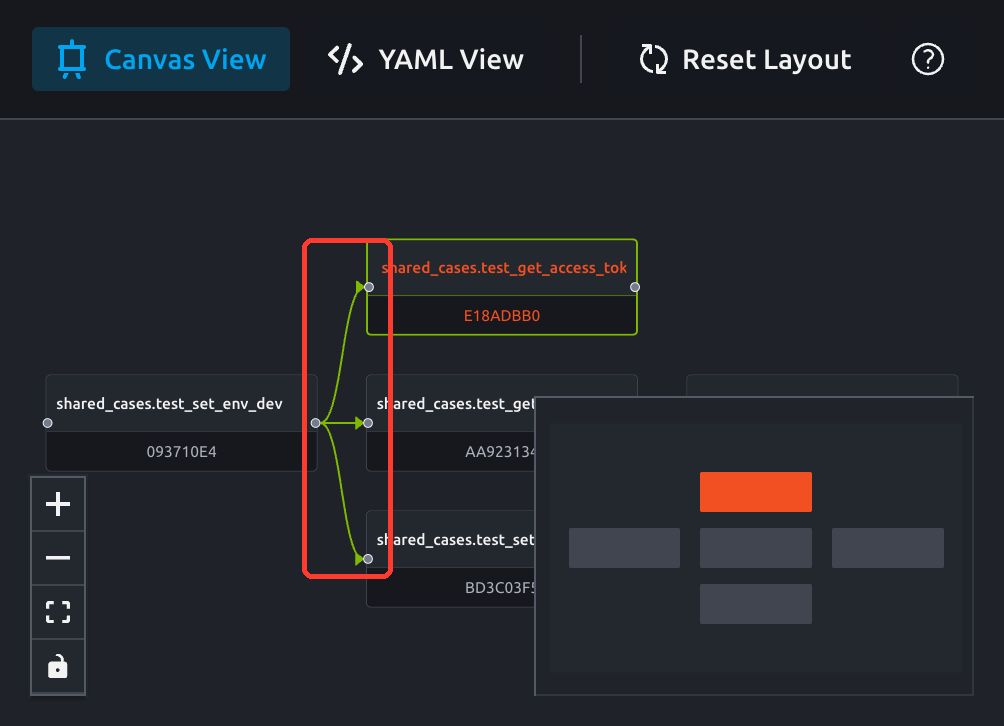
Plain TextA ├─ whenPassed -> B ├─ whenPassed -> C └─ whenPassed -> D
The equivalent YAML is:
YAMLkind: rule/v1.3 spec: rules: - run: A1B2C3D4 - run: B1B2C3D4 whenPassed: A1B2C3D4 - run: C1B2C3D4 whenPassed: A1B2C3D4 - run: D1B2C3D4 whenPassed: A1B2C3D4
After A1B2C3D4 passes, B1B2C3D4, C1B2C3D4, and D1B2C3D4 become ready in the same wave. Whether they start at exactly the same time depends on the available concurrency slots in the current Workspace. If slots are limited, Testany queues and fills them as slots become available.
Root cases without incoming edges can also be scheduled in parallel in rule/v1.3:
YAMLkind: rule/v1.3 spec: rules: - run: A1B2C3D4 - run: B1B2C3D4 - run: C1B2C3D4
Mark Expect Fail
Select a case node and turn on Expect Fail in the right-side Properties Panel. The red box marks the Expect Fail control.
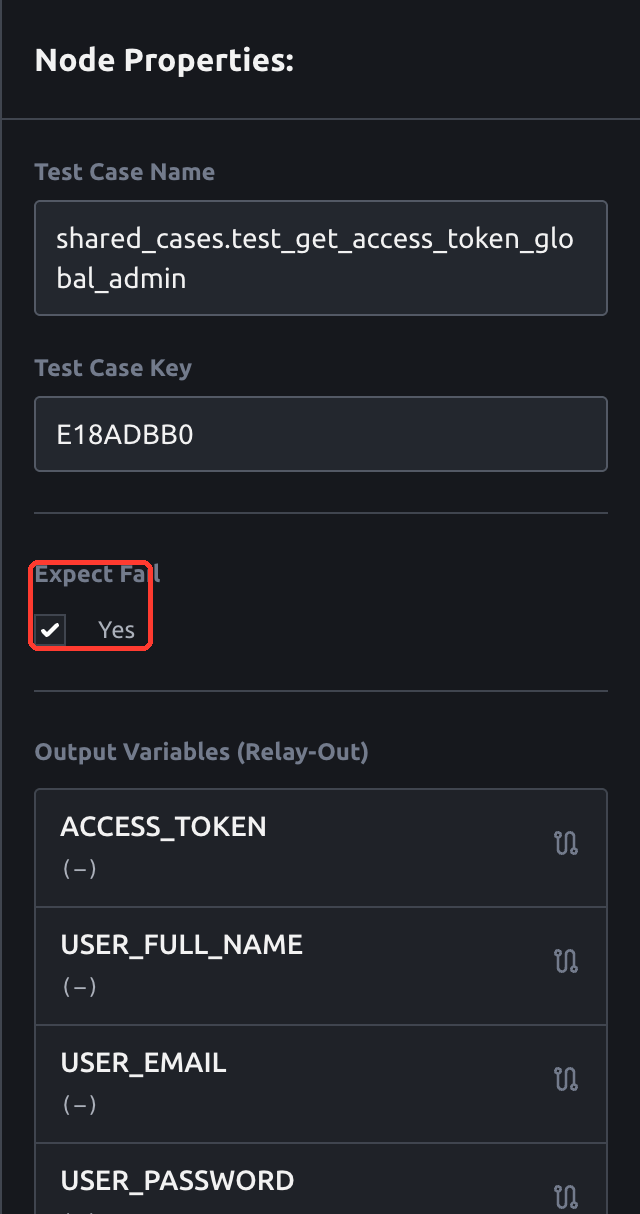
The generated YAML looks like this:
YAML- run: B1B2C3D4 whenPassed: A1B2C3D4 expect: fail
expect: fail means the case reports Passed to the Pipeline even if the actual case execution fails. Therefore, any downstream case that should continue after this case must use whenPassed, not whenFailed.
Configure Relay
Relay passes runtime values produced by an upstream case into a downstream case.
Prepare Relay Cases
Before configuring relay, prepare the case environment variables:
- The upstream case must have Output Variables, also called Relay-Out variables.
- The downstream case must have Input Variables, meaning
type: envinput environment variables. - Variable names should match the test script read/write logic.
For case-side setup, see Managing Test Case with Relay Case and Understanding Output Relay.
Configure Relay in Pipeline Assembler
- Select the upstream case node that provides the data and confirm it declares Output Variables (Relay-Out).
- Select the downstream case node that consumes the data.
- In the right-side Properties Panel, find Input Variables (Relay-In).
- Click the configure icon beside the target input variable, or expand the target input variable entry.
- In the relay form, choose Select Relay-Out Case.
- Choose Select Relay-Out Variable.
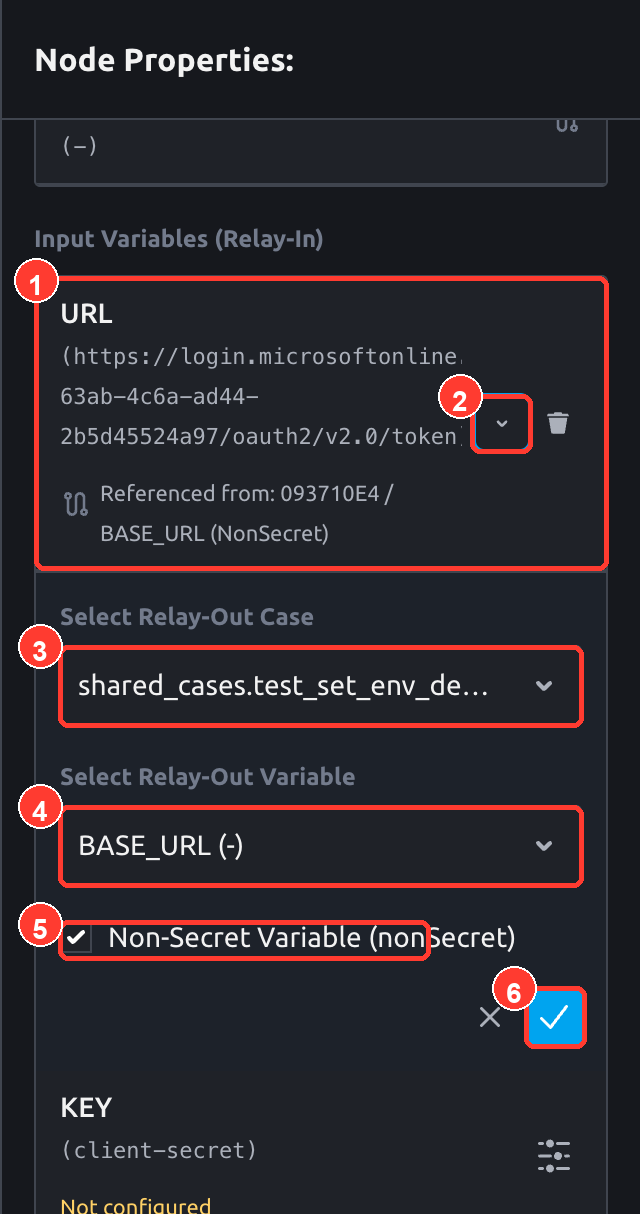
- If the value can be visible in logs, enable Non-Secret Variable (nonSecret).
- Click Apply.
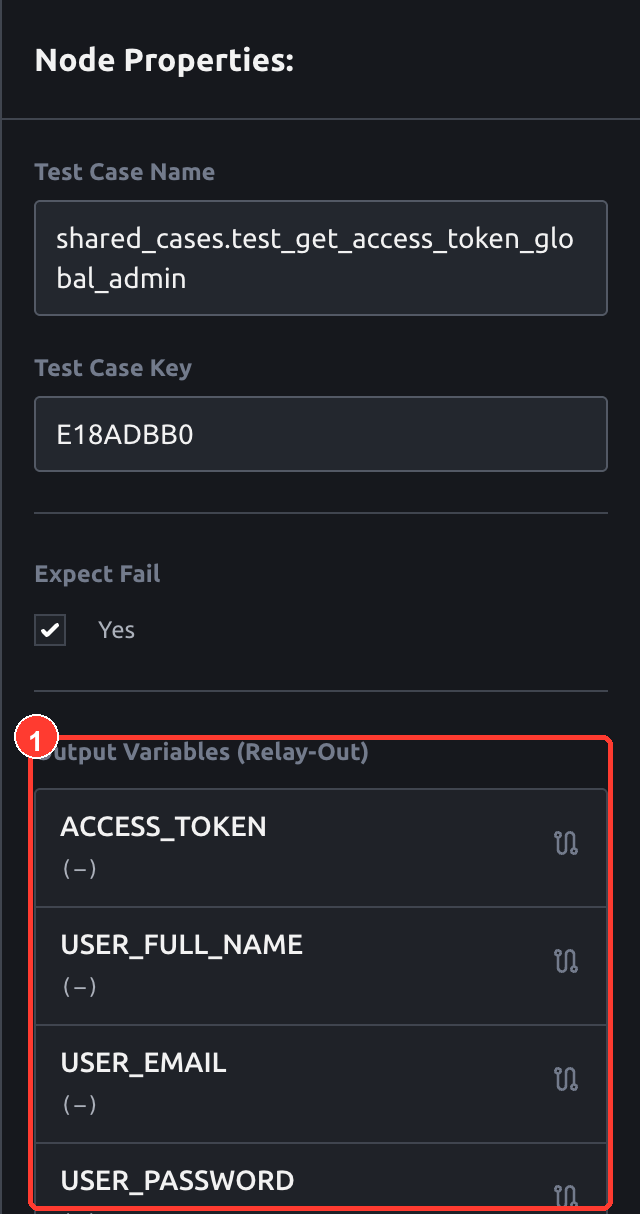
The screenshot below shows where Output Variables (Relay-Out) appears on an upstream case node. 1 marks the Relay-Out variable list. When configuring a real Pipeline, select the upstream case that should provide the runtime value.
Then select the downstream case and expand the target Input Variables (Relay-In) entry. If the entry is not expanded yet, click the configure icon beside the input variable to open the same form. In the screenshot, 1 marks the Relay-In variable card, 2 marks the expand/collapse control, 3 marks Select Relay-Out Case, 4 marks Select Relay-Out Variable, 5 marks Non-Secret Variable, and 6 marks Apply.
After saving, the YAML contains a relay entry similar to this:
YAML- run: B1B2C3D4 whenPassed: A1B2C3D4 relay: - key: ACCESS_TOKEN refKey: A1B2C3D4/ACCESS_TOKEN nonSecret: true
Relay cannot be configured across a whenFailed dependency. If an edge already has a relay reference, Testany prevents switching that edge to whenFailed. Clear the relay reference first if you must turn the edge into a failure branch.
If a downstream case consumes relay output from an upstream case, keep a clear whenPassed execution dependency on the canvas so the execution order and data dependency stay aligned.
Use YAML View
When you already know the exact rule structure, or when you need to update multiple dependencies at once, switch to YAML View.
YAML View persists these fields:
runwhenPassedwhenFailedexpect: failrelay
When you switch views or save, Testany parses the YAML, loads the referenced cases, checks the graph structure, and validates the definition with the backend. If saving fails, follow the error message to fix the YAML or switch back to Canvas View.
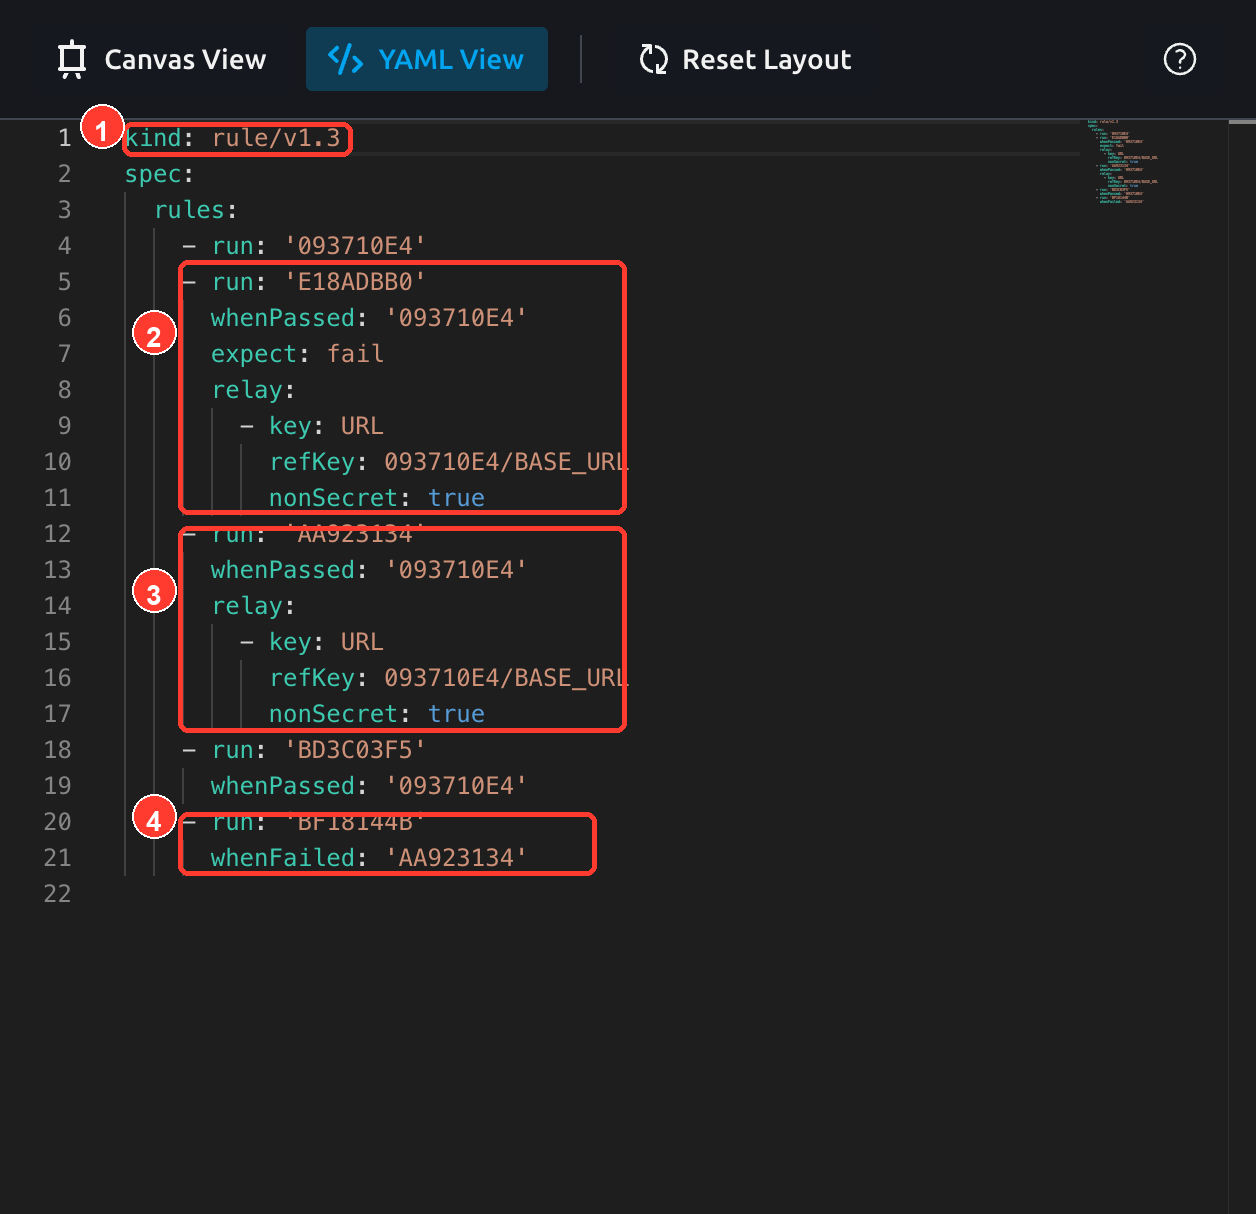
YAML View shows the same Pipeline definition that the canvas represents. The screenshot highlights: 1 the schema version, 2 an expected-failure branch with relay, 3 a sibling fan-out branch with relay, and 4 the BF18144B whenFailed failure branch.
For new or refreshed pipelines, prefer kind: rule/v1.3. If you open a legacy rule/v1.2 Pipeline, confirm that you are intentionally preserving legacy behavior; do not treat rule/v1.2 as the default for new work.
Complex v1.3 Example
The following example contains one setup case, three whenPassed fan-out downstream branches, one of those branches marked with expect: fail, relay, and one whenFailed branch that runs only when a specific branch fails.
YAMLkind: rule/v1.3 spec: rules: - run: '093710E4' - run: 'E18ADBB0' whenPassed: '093710E4' expect: fail relay: - key: URL refKey: 093710E4/BASE_URL nonSecret: true - run: 'AA923134' whenPassed: '093710E4' relay: - key: URL refKey: 093710E4/BASE_URL nonSecret: true - run: 'BD3C03F5' whenPassed: '093710E4' - run: 'BF18144B' whenFailed: 'AA923134'
In Canvas View, the core structure is that 093710E4 fans out to three downstream cases in the same ready wave, while a separate whenFailed branch remains on the graph:
This Pipeline means:
093710E4runs first.- After
093710E4passes,E18ADBB0,AA923134, andBD3C03F5become ready in the same wave and can be scheduled in parallel byrule/v1.3. E18ADBB0usesexpect: fail; if it actually fails, the failure is treated as expected and does not fail the Pipeline.AA923134consumesBASE_URLfrom093710E4.BF18144Bruns only ifAA923134reports Failed, Aborted, or Timeout to the Pipeline. IfAA923134passes,BF18144Bis skipped.
Save and Validate
When editing is complete, click Save. Testany will:
- Generate YAML from Canvas View, or read the current YAML View content.
- Validate that the YAML can be parsed.
- Validate case keys, dependencies, relay references, and cycles.
- Verify the Pipeline YAML with the backend.
- Persist the Pipeline definition.
After saving, review Flow Diagram and Test Case List on the Pipeline detail page. After triggering an execution, open Execution Detail and confirm:
- The overall Pipeline status matches your expectation.
- The
expect: failcase is shown as expected failure or an equivalent successful pipeline-level result. - A
whenFailedbranch whose condition was not met is skipped. - Fan-out branches in
rule/v1.3start in parallel within the available concurrency limit.
Troubleshooting
| Issue | What to Check |
|---|---|
| The case cannot be found | Confirm the case is registered and you are searching in the correct Workspace. |
| Two nodes cannot be connected | Check for self-loops, cycles, or whether the target node already has an incoming execution dependency. |
An edge cannot switch to whenFailed | If the edge has a relay reference, clear the relay first. |
| Relay form has no selectable variables | Confirm the upstream case exposes Relay-Out and the downstream case declares Input Variables. |
| Save fails | Check YAML structure, case keys, duplicate run, relay refKey, and the mutual exclusion between whenPassed and whenFailed. |
| Fan-out does not start at the same time | Confirm the Pipeline uses rule/v1.3 and the Workspace has enough available concurrency slots. |
Still have questions?
Our team is here to help. Get in touch and we'll get back to you as soon as possible.